
Canon DSLR Camera Settings
Use the instructions below to change the camera settings required for proper communication between the Ortery software and compatible camera.
1. EF Lens Settings
On all Canon EF, EF-S, EF-M Lenses, set:
1. Set Camera Focus toggle to AF
2. Set the Image Stabilizer to OFF. (when camera is on a tripod or mounted to the Ortery system)


2. Camera Power Source
Instead of batteries, we strongly recommend using an AC power adapter to power the camera while using the Ortery software.
3. Set Camera Mode
Move dial to M for Manual Mode.

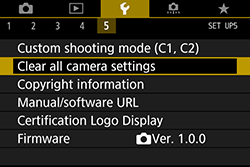
4. Clear Camera Settings
Reset your camera to its original settings by clicking "Clear all camera settings" in the system menu.
5. Menu Settings
On all Canon cameras, set:
1. "Auto power off" to Off or Disable.

2. "Auto rotate" to Off or Disable.

6. Make sure the camera is in Still Shot Mode
7. Scroll further to see if the camera requires additional settings
For the EOS Rebel T4i (650D) | EOS Rebel T5i (700D) | EOS Rebel T6i (750D)
In the 4th Camera options setting menu, select “Continuous AF” and select “Disable“.

For the EOS Rebel T7i (800D), 80D, 90D
- Turn On Live View
- Click the Menu Button
- Find the Setting “AF Method” and set it as “Live 1-point AF”


For the EOS M6 Mark II & M50 Mark II
1. Switch AF Method to " 1-point AF"


2. Disable "Continuous AF"


3. Turn IS Setting "Off"


4. Select AF Operation and choose "One Shot AF"

For the EOS 6D
While in Movie Mode and in the 5th Camera options setting menu, select “AF method” and select “FlexiZone□“.

For the 5D Mark II
Users will need to change a Preview setting.
1. Ensure the camera is disconnected from the computer
2. Press “Menu” button on the back of the camera body
3. Go to the 6th tab (2nd tools menu)
4. Select and enter “Live View/Movie func. set.”


For the 5D Mark III
1. Go to the Tools menu > select Record func+card/folder sel
2. Ensure camera Record func. is set to Standard


For the 5D Mark IV camera type:
1. Select Menu.
2. Set your “AF Method” to “FlexiZoneAF□”

Older Cameras:

Rebel XT/350D, 20D and EOS 5D camera types:
Set the camera to ‘PC Connection’ mode. Go to the second Tools menu and set ‘Communication’ to ‘PC Connection’ as pictured below.

EOS 40D, 50D and 60D camera type:
In “LV func. setting“, select and enter “Stills only” or “Stills+movie“.

Select and set “Exposure simulation“. For the Canon EOS 40D:
Select C.Fn IV: Operation/Others In this menu select: C.Fn. IV-7 Live View Exposure Simulation and -1: Enable (Simulates Exposure)

For the Canon EOS 60D:
1. Go to the 4th camera menu
2. Scroll down to Expo. Simulation and Enable
Not Sure What You Need?
Let our sales team help you make an informed decision